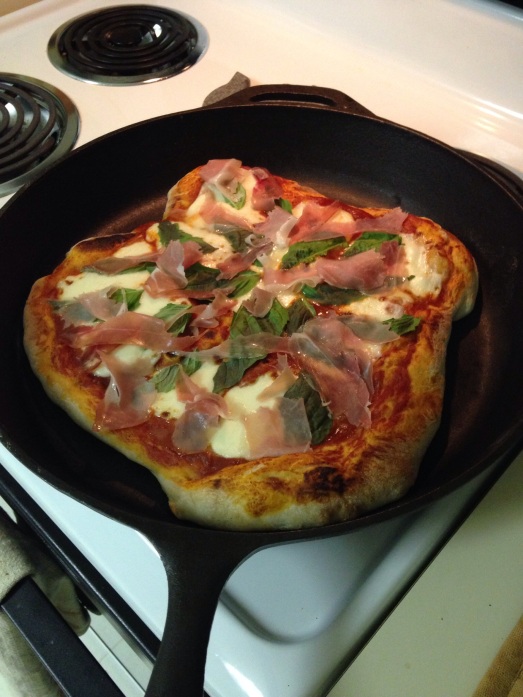
The Skillet Caprese Pizza

We typically do pizza on Friday night since that’s how I grew up (holla pizza and movie night! Does your family do that?) but this week I wanted to actually make our pizza. First, I utilized my people resources via Facebook and got two good options: a recipe from a friend and the suggestion to by the raw pizza dough from my local pizzeria. But then I found a recipe on Pinterest (duh) that would allow me to cook the pizza in a cast iron skillet in under ten minutes! Well, I followed their dough recipe and even though it was supposed to rise by double its size….needless to say, it didn’t. By Saturday morning it had risen but it smelled very odd so I said, screw it and we went to our local pizzeria and got the dough for a large pie.

Ingredients
– Pizza dough (whether you use your own recipe of by some)
– Pizza sauce (we used Ragu)

Toppings – since I wanted to do a beautiful caprese pizza I used the toppings below. But you can do whatever you want!
– Buffalo mozzarella
– Basil
– Prosciutto
Or!
– Shredded mozzarella?
– Pepperoni?
– Whatever you want!

Directions
1. Preheat the broiler on your oven.
2. Lightly grease your skillet. Heat up your skillet for 10 minutes, if it smokes then turn it down.
3. Roll out your dough to the size of your skillet. Mine was being weird so if it’s not perfect, don’t sweat it! I did and it wasn’t worth it.
4. Transfer dough into skillet, and put on sauce and cheese.
5. Let it sit for 3-4 minutes, check the bottom to time. Once it’s getting firmer/more “cooked pizza crust-y” then it’s time to transfer to the oven.
6. In the oven under the broiler leave it for 2-3 minutes on one side, then flip the skillet and do 2-3 minutes on the other side. The cheese should be getting golden brown and bubbly when it’s ready.
7. Take it out and then assemble to toppings, such as bail and prosciutto in my case. It was delicious!

IMG_1322.JPG

The Skinny Orange Chicken

One thing that has taken a dramatic upturn is my cooking. Usually for dinner I ate a head of lettuce with some chicken and balsamic and oil…like almost every night. I love it! But that’s not going to fill a grown man, nor would he appreciate eating every single day. I have been all over Pinterest grabbing recipes, and this one made it to my cookbook for saving! I found it here: http://addapinch.com/cooking/skinny-orange-chicken-recipe/#axzz2pfHUD34V

Skinny Orange Chicken
Ingredients

4 skinless, boneless chicken breasts, cut into bite-sized pieces
1 tablespoon coconut oil or olive oil
¼ cup chicken stock
3 tablespoons honey or maple syrup
2 cloves garlic, minced
1 tablespoon orange zest
¼ cup fresh orange juice
¼ cup soy sauce
1½ teaspoons Sriracha sauce
¼ teaspoon ground ginger
1 pinch red pepper flakes
1 teaspoon sesame seeds for garnish, optional
Broccoli

Instructions
1. Melt coconut oil in medium skillet over medium heat. Add in chicken pieces and cook until cooked through and browned, about 8-10 minutes. Remove from skillet and set aside.
2. While chicken is cooking, stir together chicken stock, honey or maple syrup, garlic, orange zest, orange juice, soy sauce, Sriracha sauce, ginger and red pepper flakes. 3. Pour into heated skillet once chicken has been removed and reduce to low heat.
4. Cook, stirring often, until sauce has been reduced and coats the back of a wooden spoon. Remove from heat and pour over chicken.
IMG_1084
5. To serve, spoon chicken over a bed of broccoli and then spoon on additional sauce. Top with sesame seeds, if desired.
IMG_1195

If your sauce does not thicken as desired, you may add the following to assist in the thickening: mix 1 – 2 teaspoons of cornstarch with the same amount of water to form a paste. Stir into the sauce well to thicken.

The First Expedition with Kale

I have to admit, as much as I love lettuce and salads, I don’t really enjoy kale. I find it to be just too much – too big, too bitter, too trendy! But I want to love it for its health benefits, and since I’m trying to be really good with my diet, I bought it in a fit of “I need to buy as much healthy foods as possible!” shopping one day. And then it sat in my refrigerator. Thank God it took forever to get wilt-y. I finally found a kale chip recipe I was excited to try, and truthfully it was a great success. They were delicious and honestly filling enough as a meal! Salad on the go? But it also introduced me to SMOKED PAPRIKA. How do I love thee, smoked paprika? Let me count the ways! I LOOOOOVE this spice now, and I am Googling recipes with it just so I can use it more. It’s for sure going into my chili recipe from here on out.

Zesty Kale Chips
Ingredients

– 1 large bunch of kale
– 1/4 cup tahini KB Note: I shop at Food Lion that straddles suburban and country areas so if I can find tahini, so can you! Just look over in the Asian/Indian/international foods section where you might find soy sauce or the Patak’s Indian jarred sauces.
– 1/4 cup fresh lemon juice
– 1/4 cup nutritional yeast KB Note: I made a second batch without the yeast (since I used it all!) and they came out just as well albeit less crispy.
– 1 tsp cumin
– 1/4 tsp smoked paprika KB Note: I LOVE THIS SPICE
– 1/2 tsp chili powder
– 1 tsp roasted garlic powder
– 1/2 tsp sea salt

Directions
1. Preheat oven to 300F. Line a large rimmed baking sheet with parchment paper.
2. Remove the leaves from the stems of the kale (using the same method you would if you were de-stemming collard greens) and tear the leaves into large pieces. I unfortunately made mine too small and thus when they got too much sauce on them they were still wet coming out of the oven. Make sure the kale is dry before applying the sauce.
photo 1
4. Combine all the ingredients in a food processor until smooth.
photo 2
5. Pour sauce over kale and mix until evenly coated, you’ll probably need to use your hands to get it all over.
6. Spread the kale out evenly onto the prepared baking sheet into a single layer trying not to overlap (or else it won’t crisp!)
photo 4
7. Bake for roughly 10 minutes, rotate the pan, and bake for another 12 minutes more until the kale begins to crisp up.
8. Remove from oven and let the chips cool slightly before enjoying. Just a warning, these don’t store well. They lose their crispness.

The I Love Lime Weekend

I love the lime. It is my favorite. I need to find a body lotion that smelled like I just juiced some limes so I can smell myself all day long. Seriously, I love lime. This love also translates into limey foods. Whenever I find a recipe that calls for limes and/or lime juice I always have a heavy hand when it comes to measurements. The weather is North Carolina is getting to be nothing short of idyllic and I  find it fun to not only shape my wardrobe around the weather (short-shorts abound, y’all) but also my cooking. So out with the heavy warm meals like chili and in with summer foods. This past Friday I made an absolutely amazing dinner, thanks to my main source of inspiration! Link: http://www.keyingredient.com/recipes/13096053/shrimp-tacos/

Cilantro Lime Shrimp Tacos
Ingredients
– lb of frozen shrimp, defrosted, peeled, & deveined
– 6 oz fat free Greek yogurt
– ¼ cup chopped cilantro
– 2 tbsp fresh lime juice
– ½ tsp cayenne pepper
– ½ a head of cabbage, thinly sliced (about 5 cups) KB Note: I subsituted a head of iceberg since none of us were too thrilled by cabbage, I used ¾ of the head of lettuce and still had a good bit left over
– 8 corn tortillas KB Note: I substituted whole wheat tortillas instead, we probably went through 8 to 10
– 4 tsp extra virgin olive oil
– Salt and pepper to taste

Directions
1. Heat tortillas over medium heat in a dry skillet until warm and starting to form small brown spots. Set aside on a plate covered with a clean kitchen towel.
2. Mix yogurt, cayenne, lime juice, cilantro, and salt in a small bowl, set aside. KB Note: I have the mildest palate in the world and the sauce is just the right amount of heat. DO NOT over season the shrimp like I did or else the heat does get to be a bit much. I had to drink milk with it.

Smelled so good!

Smelled so good!

3. If you want to use fresh lettuce for a bit more crunch, skip this step. I still wanted to sauté just a little bit. Heat two teaspoons of olive oil in a medium non-stick skillet and add lettuce. Cook for about 2 to 4 minutes. Not long since it’s not as dense as the cabbage used in the original recipe. Season with salt and pepper and set aside.

What my lettuce looked like when it was done.

What my lettuce looked like when it was done.

4. Cut shrimp into thirds, so you have little bite size pieces. Sauté in two teaspoons of olive oil and season with salt, pepper and a dash of cayenne pepper (JUST A DASH!) over medium heat just until done, this should only take a few minutes if you bought pre-cooked frozen shrimp.
5. Prepare the tacos! These were seriously good.
photo 5

The Pizza Alternative

I just made this for dinner and apparently none of my friends like mushrooms! Why do mushrooms get such a bad rep?! They’re the bomb! I’m going to start sneaking them into recipes to trick people into converting so that I can force them to eat these dishes with me.

I had to go food shopping tonight and decided to make things interesting rather than a boring old tilapia fillet and head of lettuce (which is my usual dinner – balsamic on both). I went to my fave site for healthy recipes, http://healthyrecipesblogs.com/, and via her recipe index chose the 30 min recipes. I figured I just wanted something easy and smaller tonight so I went with her portobello mushroom pizza http://healthyrecipesblogs.com/2013/06/24/portobello-pizza/.

Portobello Mushroom Pizza
Ingredients


– 2 large Portobello mushroom, wiped clean, stem removed
– Olive oil cooking spray
– 1/2 cup of your favorite no-added-sugar marinara sauce KB Note: You don’t necessarily have to use sugar-free, I went with a cheap store brand
– 2 oz part-skim Mozzarella cheese, shredded (1/2 cup)
– 2 tablespoons grated Parmesan
– 4 basil leaves, torn to pieces, or 2 teaspoons fresh oregano leaves

Directions

1. Preheat broiler, setting temperature to high. Set oven rack in the middle of the oven. Line a large baking sheet with foil for easy cleanup.
2. Spray the mushroom caps with olive oil spray on both sides. Broil 5 minutes on each side, or until just tender.
photo 1 3. Remove the mushrooms from the oven, keeping the broiler on. If the mushrooms have released some of their water content, drain them briefly on paper towels and wipe the baking sheet dry, then return the mushrooms, gill side up, to the baking sheet.
4. Fill each mushroom cap with half of the marinara sauce, mozzarella and Parmesan. Scatter a few torn basil leaves, or a few oregano leaves, on top.
photo 2-1
photo 3 5. Place back under the broiler until cheese is browned, 2-3 minutes.
photo 4 6. Serve immediately.
photo 5

The First Slow Cooker Meal

This past Friday I planned to make my first slow cooker meal at my boyfriend’s house for everyone. I drove out there before work, stopped at the Food Lion so I could work straight through the day without having to grocery shopping, and when I came out with my bags my truck had a bunch of emergency lights on! It was an ordeal of a day which I won’t deny, had some tears involved, and thus the dinner went unmade. I had bought the shrimp in the morning and while I waited for my tow truck it started defrosting so I threw it into the fridge when I got back, so I had to make the dish before the weekend was over. So I made it for everyone before I left on Sunday! I have been wanting to experiment with slow cooker recipes more but most recipes aren’t much into clean eating or paleo. But I’ve found a few like this one, luckily! http://www.fitnessmagazine.com/recipes/quick-recipes/dinner/seven-easy-slow-cooker-recipes/?page=6 This one was outrageously easy. It made soo much, too.

Cajun Shrimp and Rice
Makes: 6 servings
Ingredients
– 1 28-ounce can diced tomatoes
– 1 14-ounce can chicken broth
– 1 cup chopped onions
– 1 cup chopped green bell pepper
– 1 6- to 6-1/4-ounce package long-grain and wild-rice mix, such as Uncle Ben’s
– 1/4 cup water
– 2 garlic cloves, chopped
– 1/2 teaspoon Cajun seasoning
– 1 pound cooked, shelled and deveined shrimp
– Hot-pepper sauce (optional) KB Note: I didn’t do this, but I think it could use it!

Directions 

1. In a 3-1/2- or 4-quart slow cooker, combine tomatoes with their juices, chicken broth, onions, bell pepper, rice mix with seasoning packet, water, garlic, and Cajun seasoning.
photo 1 2. Cover; cook on low-heat setting 5 to 6 hours or on high-heat setting 3 to 3 1/2 hours.
3. Stir shrimp into rice mixture.
4. Cover; cook for 15 minutes longer at high-heat setting.
photo 3 5. Sprinkle with hot-pepper sauce if desired.

Nutrition facts per serving: 223 calories, 21g protein, 32g carbohydrate, 2g fat (0g saturated), 3g fiber

The Friday Night Friend Dinner

I do a lot more cooking for multiple people now and it’s a nice change from cooking for one! Trying to make healthy items for everyone is difficult but luckily the group is pretty open to most recipes I want to try. This one was a hit, and I was having trouble keeping everyone away from the mixture before I could get it into the wrappers! Definitely something you could put on a salad as well. I adjusted the recipe for myself since I do not like frozen corn and didn’t want to add spinach to the egg rolls. I added peppers per the note in the original recipe found here http://www.nutritiouseats.com/baked-southwestern-eggrolls-meal-planning/. I forgot to follow the recipe and saute the pepper though, and next time I’ll try that. I tried to compensate by extended the cook time in the oven but that just made them too crispy.

Baked Southwestern Eggrolls
Ingredients:
– 2 red peppers
– 1 green pepper
– 1 can (15 oz) black beans, rinsed and drained
– 1 1/2 cup shredded Mexican cheese blend
– 1 can (4 oz) chopped green chilies, drained
– 4 green onions, chopped
– 1/4 cup chopped cilantro
– 1 teaspoon ground cumin
– 1/2 teaspoon chili powder
– 1 teaspoon salt
– 1/2 teaspoon pepper
– 1/4 teaspoon cayenne red pepper
– 1 package (21) egg roll wrappers

**1 egg beaten for sealing egg roll (can substitute water)

Directions
1. In a large bowl, combine everything but the egg roll wrappers.

big bowl of goodness

big bowl of goodness

Look at all those colors!

Look at all those colors!

Place ~1/4 cup mixture in the center of one egg roll wrapper. Fold bottom corner over filling. Fold sides toward center over filling and continue to roll tightly to seal (see directions on egg roll wrapper). Using your finger, moisten remaining corner with egg. Repeat.
2. Place seam-side down on a baking sheet coated with cooking spray. Brush tops of egg rolls lightly with olive oil.

I wasn't so great at the rolling...

I wasn’t so great at the rolling…

3. Bake at 425 degrees F for 10-15 minutes until lightly brown. Turn them halfway through baking. Don’t over cook or the crust will get too hard.
4. Serve warm with salsa, guacamole and/or sour cream.

The Comfort Cooking Dinner

I’ve been dying to make good down home Southern chicken and biscuits, but I don’t have the time to be making some crock pot recipe that takes over 2 hours to cook on top of the prep time, but I finally found a recipe that didn’t look too difficult or too time consuming. http://tastykitchen.com/blog/2011/11/homemade-chicken-and-dumplings/  One day I’m going to learn to use hyperlinked text on here.

Quick n Easy Chicken n Dumplings
Ingredients
– 2 cups flour
– ½ teaspoons baking powder
– 1 pinch salt
– 2 tablespoons butter
– 1 cup milk, a bit less than a full cup
– 2 quarts chicken broth (64 oz) KB note: I used a little bit more than called for, around 77 oz
– 3 cups cooked chicken (1 rotisserie chicken) KB note: I chose to use a normal sized rotisserie chicken and a second smaller one as well. We had three to four people eating with us.

Directions
1. In a bowl, combine the flour, baking powder and salt. Cut the butter into the dry ingredients with a fork or pastry blender.
2. Stir in the milk, mixing with a fork until the dough forms a ball.
3. Heavily flour a work surface. You’ll need a rolling pin and something to cut the dumplings with, a knife or pizza cutter. You may want to use a small spatula to lift the dumplings off the cutting surface.
4. Roll the dough out thin with a heavily floured rolling pin. Dip your cutter in flour and cut the dumplings in squares about 2″x2″. It’s okay for them not to be exact. Just eye ball it. Some will be bigger, some smaller, some shaped funny.
photo 1 (1)
5. Use the floured spatula to put them on a heavily floured plate. Just keep flouring between the layers of dumplings.
photo 2 (1)
6. Bring the broth to a boil while cutting the pieces. Drop the dumplings in one at a time, stirring while you add them. The extra flour on them will help thicken the broth. I plan on adding just a little more flour to make it thicker. Cook them for about 15-20 minutes or until they not doughy tasting.
7. Add the cooked chicken to the pot and you’re done! I let it sit on low for another 15-20 minutes before we were ready to eat and it was great!!!
photo 3

The Valentines Day Dinner

I have a small obsession with the show Chopped and my favorite episodes are the amateur chefs, because it makes me want to continue to expand my knowledge base. I even want to look into a cooking course! Definitely something I should look into know that I’m almost a real 25 year old grown-up! My boyfriend and I did a combo V-day and B-day night celebration last night for me as my birthday is this coming Monday but we could only get together on Friday and Saturday. I wanted to make a nice dinner for us and gave him a few options. What we decided on was a stuffed flank steak! http://www.familycircle.com/recipes/comfortfood/stuffed-flank-steak/?page=1 I threw in some steamed green beans and oven roasted red potatoes. We both want to eat healthier, so this was a perfect option. It turned out wonderfully, although I did make one mistake with the cook-time.

Stuffed Flank Steak
Ingredients

– 1 flank steak (1 1/2 to 2 pounds) – KB Note: I couldn’t find flank steak or anything that I could cut per the directions so I opted for a package of thin sliced steak.
– 1 package frozen chopped spinach, thawed
– 1/2 cup crumbled blue cheese
– 1 jar (7 ounces) roasted red peppers, drained and chopped
– 2 tablespoons seasoned dry bread crumbs
– 1 egg yolk
– 3/4 teaspoon garlic salt
– 3/4 teaspoon ground black pepper
– 1 tablespoon olive oil

Directions
1. Heat oven to 425 degrees F.
2. Lay steak on work surface. Holding sharp knife parallel to work surface and starting at a long side, slice flank steak in half to opposite long side, without cutting all the way through; open up the steak like a book. Flatten slightly to an even thickness. KB Note: I bought the thin sliced steak since I knew I had to cut it anyways.
3. Squeeze liquid from spinach; discard liquid. In medium-size bowl, combine spinach, cheese, peppers, bread crumbs, egg yolk, 1/4 teaspoon each of the garlic salt and the pepper.
4. Season steak with an additional 1/4 teaspoon each of the garlic salt and pepper. Press filling onto steak, leaving a 1-inch border on all sides. KB Note: I had 4 of the small sized thin cut steaks but I still kept about a 1/2 inch border on the sides.
5. Roll up steak to enclose filling, beginning on a short side; the grain of the meat will be running from left to right. Tuck any loose filling back into ends.
photo-21
6. Tie steak with cotton twine at 2-inch intervals to secure. Rub outside with oil, then sprinkle with remaining 1/4 teaspoon each garlic salt and pepper.
7. Roast at 425 degrees F. for 35 minutes, then increase heat to broil and broil for 10 minutes. KB Note: I overcooked my the meat because I used this timing. If you go the thin cut steak route like I did then I recommend you cook for 15 minutes at 425 only. The top layer of meat was very, very tough. Thank GOD it tasted AMAZING.

The Friday Night Solo Date Night Dinner

I decided to have a “Kate Date Night” last night and just have a fun solo night in. Dinner and a movie with some wine on the couch was exactly what I wanted. I didn’t want to have to buy a bunch of things for a full meal so I decided to do something smaller, a paleo vegetable curry. I’ve continued to keep searching for healthy recipes and came across my new favorite website, http://healthyrecipesblogs.com. This woman is beyond amazing. The recipes not only are incredibly healthy but she also gives you the nutritional facts which I adore. I will definitely be blogging about her recipes a lot. I already printed out so many for my recipe binder!! The vegetable curry was sooo delicious, easy, and healthy! http://healthyrecipesblogs.com/2013/05/22/spicy-vegetable-curry/ It was exactly what I needed.

veg curry1

Ingredients
– 4 tablespoons olive oil
– 1/2 lbs. cubed butternut squash (or 1 medium sweet potato, peeled and cubed) KB Note: I went over with the butternut squash because I love it so much. I’ll use a whole squash next time.
– 1 medium eggplant, cubed KB Note: I wouldn’t use as much eggplant next time. It got too mushy.
– 1 large green bell pepper, chopped
– 1 large red bell pepper, chopped
– 1 large onion, chopped
– 2 teaspoons kosher salt, divided
– 1 tablespoon minced garlic
– 1 tablespoon curry powder
– 1 teaspoon ground turmeric
– 1 teaspoon ground cumin
– 1 teaspoon ground coriander
– 1/4 teaspoon cayenne pepper
– 1 cup water

Directions
1. Heat oil in a large, deep skillet over medium-high heat, about 2 minutes. Add the butternut squash, eggplant, peppers, onion and 1 teaspoon kosher salt.

veg curry2

All the ingredients combined!

Cook over medium-high heat, stirring, for 5 minutes. Add the garlic, curry powder, turmeric, cumin, coriander, cayenne pepper and 1 more teaspoon kosher salt and cook, stirring, 2 more minutes, until vegetables are well-coated.

With all the spices except the garlic I forgot to buy, whoops!

With all the spices except the garlic I forgot to buy, whoops!

2. Stir in the water. Bring to a boil, then lower heat to medium-low and simmer 20 minutes, covered, stirring occasionally, until vegetables are tender. Turn heat off and allow to rest for 5 minutes.

All finished, missing a bowl full already :)

All finished, missing a bowl full already 🙂

You’re going to have enough for four people easily. I have a lot left over. Just be prepared to have the smell of curry linger in your house afterwards!!